


Table of Contents
Why check shutter speeds?
Avoiding exposure errors
Over time, shutter speeds can deviate from the values indicated on the shutter speed dial and twist your exposure.
Knowing the effective shutter speeds allows you to compensate for any discrepancies or determine whether a camera is still usable.
How to do it?
The costly specialized device
There are expensive devices (starting at €70) that provide highly accurate shutter speed readings. You can also pay someone to check it for you, but it will always cost you.
If you have only one camera you want to verify, you may not like these options.
Using your eyes and your ears
You can obviously identify a problem by ear or sight, but you might want more precision, especially for faster shutter speeds.
Using a digital camera
Therefore, I propose my method, which can be done at no cost if you have a digital camera with accurate shutter speeds and provide at least a good estimate.
It also allows you to identify a shutter curtain synchronization problem (unevenly exposed film).
My method
I. The setup:
All you need to realize this test is a digital camera, a lightbox or a screen phone if you have nothing else.
You have to be able to keep these 3 elements plus the tested camera immobile and stable during the tests.
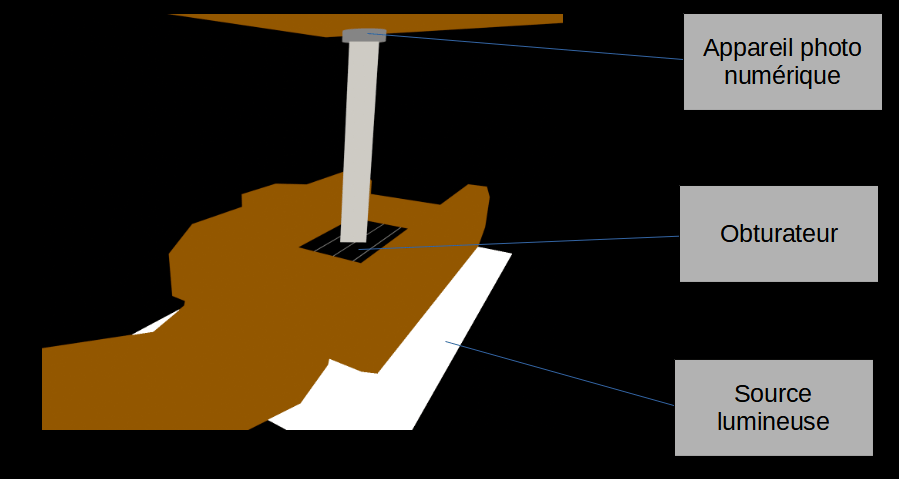
- I turn on a light table or use a phone displaying a white image. This light source must remain uniform and of the same intensity throughout the entire operation.
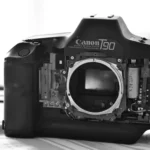
- I remove the lens and open the cover of the device I want to test. I place it on the screen or light table (I put it on a tripod or wedge it between two books if I don’t want it to come into contact with the screen).
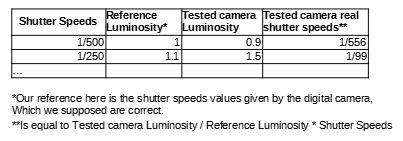
II. Retrieve the reference values
This step will allow you to recuperate reference values.
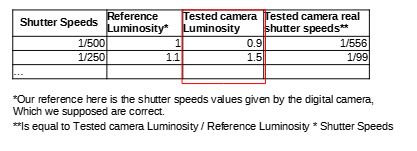
Those reference values are the one of your digital camera. Shutter speeds values of your digital camera, have to be correct.
At the end, you will end up with luminosity values given by the different shutter speeds of your digital camera.
- I select the “bulb” or “B” speed of the camera to be tested and press the shutter button. Keep the shutter button pressed so that the shutter remains open – using a flexible cable makes this easier.
- I then grab a digital camera (with its lens mounted, fo course). You must shoot in RAW format. Otherwise, your values may be distorted by the processing done by the digital camera.
- The operations need to be done in total darkness. The only light source is the light table or the phone. Unwanted light sources could twists the measurement and make results irrelevant.
- Take a series of photographs of the open shutter, using all the speeds of the camera I am testing.
- The same angle and distance must be maintained for the pertinence of future comparisons.
- The images just need to be exposed correctly (ideally with the peak brightness in the middle of the histogram).
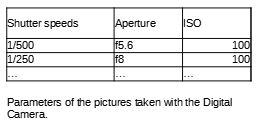
- Note the apertures and ISO settings used for the following steps. You’ll have to reuse them for the next step.
The parameters you should note are :
III. Retrieve the real values of the tested device
This step will allow you to recuperate the tested camera values.
We do the same thing as in step two, but in reverse. You have to use the same ISO and aperture values as the previous step.
For example, if you use f5.6 and ISO 100 for 1/250 in the previous step, keep using f5.6 and ISO 100 while firing 1/250 with the tested camera in this step.
- We keep the same position
- The digital camera is triggered in bulb mode.
- The shutter speed to be tested is triggered on the tested film camera.
- We stop shooting with the digital camera.
- We repeat the operation for the other speeds to be tested.
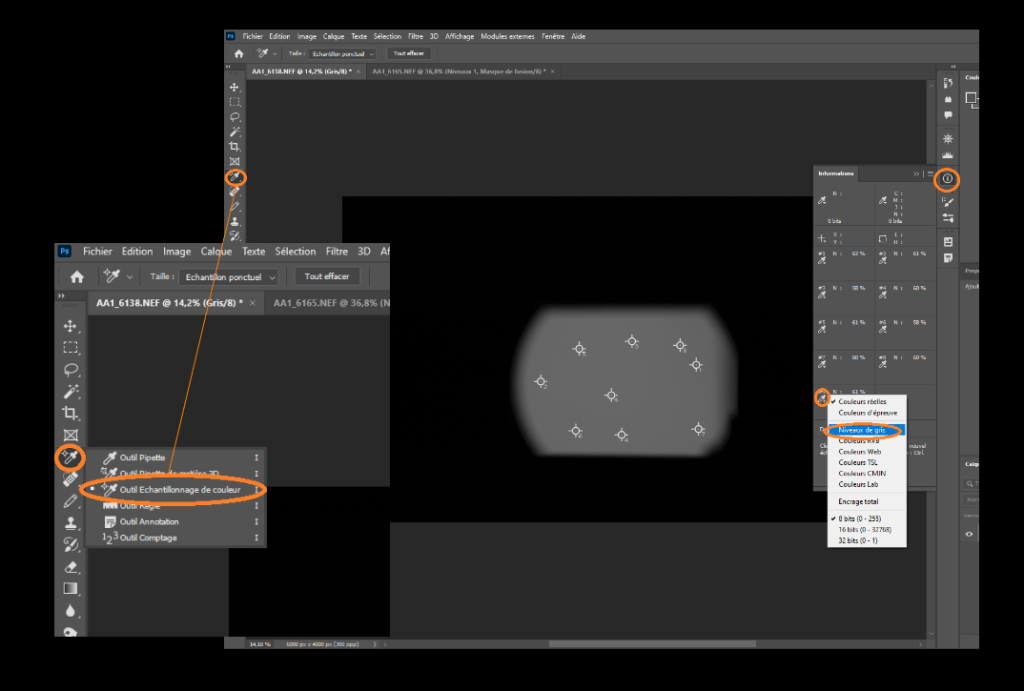
IV. Analyze the results
If the values obtained in steps II and III are similar, then everything is fine.
If on an image you took in step III you notice large differences in brightness accross the image (more than 8% for example), then your device may be suffering from a curtain synchronization defect.
Conclusion
This is a lot simpler to proceed with a specialized measurements tool. However if you have just one camera to test, this method could be interesting.
I haven’t seen anyone else proposing this method yet. Please leave feedback in the comments if this method works well and if there are improvments to be done !


Leave a Reply